Misc. Notes
This layout still gives the option to boot into one of two modes: either the live mode where changes are written to RAM only, or the persistent mode where changes are written to the flash drive (to partition 5). The user is advised to watch the amount of free space left in the snapshot. For the live mode, the amount of free space depends on the amount of RAM installed on the hardware. For the persistent mode, I have set the size of partition 5 to allow for roughly 4G of changes. I think that should work because 4G of changes plus 4G of static data in the base layer equals 8G total in the root filesystem. However, use this project at your own risk! For example, if you need files from the persistent snapshot, then it is possible to back them up externally. You can save them using a simple backup method, say, login as root and use tar to backup the files in question. If you want to hear about other possible backup methods, then just ask.
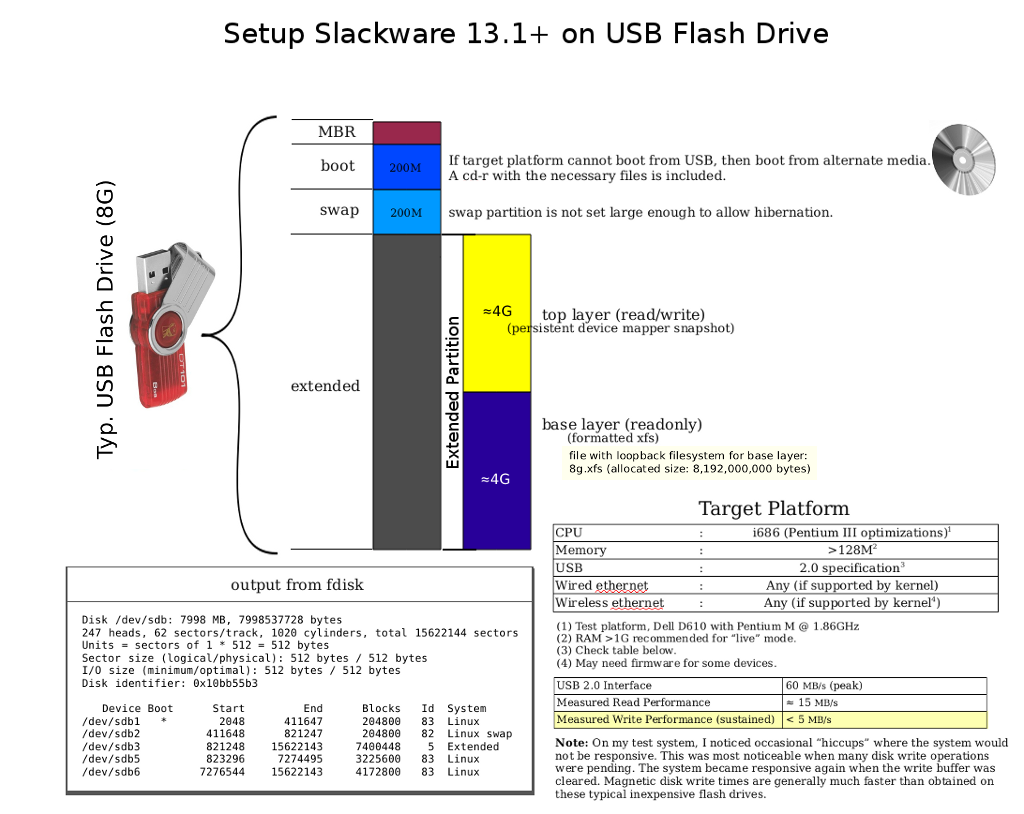
Here is my previous graphic, updated to show the new layout, setup on an 8G flash drive.
 1.
1.An 8G file on a 4G partition seems to be impossible at first glance. The trick is to store the base layer on a sparse file. XFS supports sparse files, that means blocks are not allocated until they are actually used. The file is first allocated with the command sequence:
# dd if=/dev/zero of=8g.xfs bs=1024 count=0 seek=8000000
If you want to directly install the base layer into this container, then it is probably a good idea to limit the initial extent to 4G. This will prevent running out of space prematurely, and we can fix it up later.
# losetup /dev/loop0 8g.xfs
# echo 0 8000000 linear /dev/loop0 0 | dmsetup create 4g
# mkfs.xfs /dev/mapper/4g
# mount /dev/mapper/4g /mnt/floppy
Install the packages you want using installpkg (with the specified root.) Then after the base layer contains all the expanded packages, you can resize it.
# umount /mnt/floppy
# dmsetup remove 4g
# mount /dev/loop0 /mnt/floppy
# xfs_growfs /mnt/floppy
# umount /mnt/floppy
# losetup -d /dev/loop0
From now on, make minimal changes to the file holding the image. If you make too many changes, you could really run out of space. Also, if you attempt to backup the file with tar, the OS provides data for the sparse blocks- in effect expanding it on the fly. This may present another problem and may not be what you want. I used a slightly different tactic to avoid that problem. In any case, don't change the file if you have started using the persistent snapshot on partition 5! This is because the base layer must remain constant and changes go to the "top" layer. Restated, if you change the base layer, you must also reinitialize the persistent snapshot! Be careful!
Update: 2010-12-31
Here is some introductory documentation for the set of test devices that I have been working on.
Update: 2011-04-07
I have added this post which discusses my startup environment in more detail.
No comments:
Post a Comment