Tuesday, December 28, 2010

DIY: Slackware on USB Flash (8G)

As mentioned in my previous post, it is possible to use an 8G flash drive, instead of the larger (and pricier) 16G version.

Misc. Notes
This layout still gives the option to boot into one of two modes: either the live mode where changes are written to RAM only, or the persistent mode where changes are written to the flash drive (to partition 5). The user is advised to watch the amount of free space left in the snapshot. For the live mode, the amount of free space depends on the amount of RAM installed on the hardware. For the persistent mode, I have set the size of partition 5 to allow for roughly 4G of changes. I think that should work because 4G of changes plus 4G of static data in the base layer equals 8G total in the root filesystem. However, use this project at your own risk! For example, if you need files from the persistent snapshot, then it is possible to back them up externally. You can save them using a simple backup method, say, login as root and use tar to backup the files in question. If you want to hear about other possible backup methods, then just ask.

Here is my previous graphic, updated to show the new layout, setup on an 8G flash drive.

1.

An 8G file on a 4G partition seems to be impossible at first glance. The trick is to store the base layer on a sparse file. XFS supports sparse files, that means blocks are not allocated until they are actually used. The file is first allocated with the command sequence:


# dd if=/dev/zero of=8g.xfs bs=1024 count=0 seek=8000000


If you want to directly install the base layer into this container, then it is probably a good idea to limit the initial extent to 4G. This will prevent running out of space prematurely, and we can fix it up later.


# losetup /dev/loop0 8g.xfs
# echo 0 8000000 linear /dev/loop0 0 | dmsetup create 4g
# mkfs.xfs /dev/mapper/4g
# mount /dev/mapper/4g /mnt/floppy


Install the packages you want using installpkg (with the specified root.) Then after the base layer contains all the expanded packages, you can resize it.


# umount /mnt/floppy
# dmsetup remove 4g
# mount /dev/loop0 /mnt/floppy
# xfs_growfs /mnt/floppy
# umount /mnt/floppy
# losetup -d /dev/loop0


From now on, make minimal changes to the file holding the image. If you make too many changes, you could really run out of space. Also, if you attempt to backup the file with tar, the OS provides data for the sparse blocks- in effect expanding it on the fly. This may present another problem and may not be what you want. I used a slightly different tactic to avoid that problem. In any case, don't change the file if you have started using the persistent snapshot on partition 5! This is because the base layer must remain constant and changes go to the "top" layer. Restated, if you change the base layer, you must also reinitialize the persistent snapshot! Be careful!

Update: 2010-12-31
Here is some introductory documentation for the set of test devices that I have been working on.

Update: 2011-04-07
I have added this post which discusses my startup environment in more detail.

Monday, December 20, 2010

DIY: Slackware on USB Flash on old PC

I was curious how well the project (booting Slackware-current on a USB flash drive) would work when booted on an old PC- or even if it would work at all. I pulled an old PC out of the closet for the test. I found an old Dell Latitude CPt laptop (service tag: 4AQI6). I found some spare memory for it, topping out both slots for a total of 512MB. That should help a lot, but I know other limitations might still make it unusable or cause the test to fail. The limitations include low CPU power and its v1.1 USB interface. Significantly, the USB v2.0 interface increased top speeds by a factor of 43.6x over the predecessor (480 vs. 11). That could be a serious limitation! I decided to go forward with the test anyway. To my surprise, it booted just fine- albeit a bit slow compared to modern hardware; probably mostly due to the USB speed and its CPU- a Celeron 400Mhz (Mendocino - P6 class).


More Details
I don't think this hardware will boot from USB. I booted from a CD-ROM. Also, I couldn't find any PCMCIA wireless cards, but I did find a Viking 56k modem card. I connected to my ISP and started running Firefox. Here are a couple of screenshots. Notice that the download speed is 5 kB/s, i.e. 56k max speed. Here are the startup logs and some stats while running. Note times referenced in the log are wrong because I didn't set the clock before booting and it had reverted to its default time due to a dead motherboard battery.

.

Final Word
People are constantly upgrading hardware and that means there are a lot of spare computers lying around. If you have a spare P4-class computer, or a spare P3/Celeron computer, then consider using it with a secure OS: GNU/Linux. This is especially true because Windows 95/98/Me/NT/W2k are all "expired." Meanwhile, the hardware lives on.

Update: 2010-12-21
For "desktop" use, I think the above hardware may be just a bit too low, especially in "live" mode relying on the USB bus. I left the PC running for the day, and it experienced some serious hiccups and performance degradation over time. I think this hardware would work better with an actual magnetic hard disk instead of the USB flash drive; and perhaps finding a system with a 650MHz P3 processor, instead of a 400MHz Celeron. I noticed some minor hiccups even on more modern hardware, but on hardware of this vintage the hiccups were much more severe. Maybe, I'll run some more tests later on other low-level hardware.

Possible next test bed:


MotherboardDFI CM33-TL/G
CPUSingle slot: Celeron 1.3GHz
Memory512M to 1G PC133
Videoonboard ATI 8M
USBBelkin USB 2.0 on PCI bus


One common problem of P3 vintage hardware is that the builtin USB is v1.1, not v2.0. That means it is usually necessary to find a USB 2.0 add-in card. The P4 generation (and later) motherboards usually do have builtin USB v2.0 slots. The other problem causing "premature" death of hardware is failing motherboard capacitors. That problem seems to be very prevalent on certain brands.

Interesting Computer Security Story

Here is an interesting headline with serious security implications for computer networks.
.

Wednesday, December 15, 2010

Stand up for the Bill of Rights? Anyone? Beuller?

This story is one that slips under the radar, but it has the potential to be as big of story as the warrantless wiretapping cases. This is another case with widespread implications for computer network security. IPSEC is a separate TCP/IP protocol designed for creating encrypted tunnels suitable for VPN traffic. For example, it is widely used to create encrypted tunnels between "home office" and "branch office" networks. The general idea is to create a wide area network with connections via the internet over secure and encrypted tunnels. The potential compromise of OpenBSD's IPSEC implementation raises serious security concerns because OpenBSD's permissive license allowed it to be used on a lot of hardware, especially "dedicated" VPN boxes.

This is a story to watch. A bunch of people are going to be taking a second look at the code. If it turns out there is a backdoor, it will be especially ironic because Theo de Raadt forked OpenBSD from FreeBSD mostly because he insisted on better security code auditing.

Here is Slashdot's headline.

Also,
The Fourth Amendment doesn't really count for much any more. The disposition of the Mark Klein case is discouraging. I heard part of this interview.
Here it is broken into 10 minute segments:
1.
2.
3.
4.
5.

Monday, December 13, 2010

Multipart containers

Recently, I wrote a response to a newsgroup question about spanning data blocks over multiple media**. That post refers to an earlier post with a detailed example in the "appendix" section. The advantage of using a container made from predefined data blocks is that cut/paste operations are not required. This is because the container is defined using a device mapper table. There are a couple of disadvantages. First, the size of the container must be determined in advance*, and there could be some wasted space when the last block is not full, etc. The other main disadvantage is the extra complexity that the technique introduces. Certainly, it is much simpler to work without introducing sub-blocks and work with one big file instead. Sometimes that is not possible- necessity demands a more complex solution. This technique still has a useful place for me, especially when data exceeds the size of one optical disc.

* While writing this, I realized that these containers are actually dynamically expandable if certain conditions are met. The first condition is that the filesystem used for the container must be expandable. I use XFS and it is dynamically expandable. The second condition is that data stored on the container must be compatible with expansion. If these conditions are met, then expanding the container could be as simple as allocating another block and adding another line to the device mapper table configuration.


Update: 2010-12-28
** Once again, Google decided not to archive my response on that thread. Here is the content:

>On Fri, 10 Dec 2010 21:12:03 +0000, Rui Maciel wrote:
>
> Is it possible to create a multipart gzip archive without resorting to
> the split/cat pair of commands?
>
>
> Thanks in advance,
> Rui Maciel
>
Almost anything is possible; whether it is practical is another matter.
If it is a "one of a kind" or rare event, then it may not be practical
to investigate other possibilities. That said, it was practical for me
to figure this out because I need to write in blocks which "span" across
optical media quite often.

I wrote about the technique here:
http://groups.google.com/group/comp.os.linux.misc/msg/6e34937952916a9a

Once you define a "container" you can put whatever you like into it
(simple data, compressed data, loopback filesystems, encrypted data,
etc.)

Thursday, December 9, 2010

FYI: Using a device mapper snapshot-origin device.

I created this webpage and posted it for comments to aols here.

No millionaire left behind...

.

Meet the new boss. Same as the old boss. I swore I wouldn't get fooled again. How different would things be if McCain had been elected? Ok, there would be that "one heartbeat away" fear factor. Beside that, not a dime's worth of difference. No banker has been left behind*. Meanwhile, gold is at over $1400; it doesn't look like the dollar will last much longer as the world reserve currency. It doesn't send a good message to the world credit markets if the richest Americans can't tighten their belts even one notch.


Obama better start appealing to his base- lest he ends up as another Jimmy Carter, or worse. He may only get one chance to make any difference; might as well make the most of it. We want someone who will fight for us, not just "itch" for a fight. The right wing is already calling this decision his Neville Chamberlain moment. The left wing wants him to go back and retake Negotiations 101.


Here is Obama's Dec. 7 news conference:
1.
2.
3. The polls are on our side...
4.

Monday, December 6, 2010

Facebook and tipping points...

This comment on this morning's Slashot story on the latest Facebook infraction got me thinking about how it meshes with Malcolm Gladwell's "The Tipping Point." It's been a while since I read it, but I remember the gist of it well enough: The cool kids set trends and move on when its played out. Gladwell's examples were scooters and hush puppies. It used to be that Wayne and Garth would define the new and cool lexicon, cha! That worked until they themselves realized they weren't "worthy." (Oh, yeah! Hangin' with Alice Cooper! We're not worthy...we're not worthy!)

Social media sites are all about tipping points. If not enough people participate, then that amounts to a few empty voices crying into the wilderness. They all strive to reach "critical mass," where "everyone" is online (everyone has a telephone, has a television, has a myspace account, etc.). If you're a straggler, then you're just late to the party. Whatever you have to say must not be that important afterall. I was thinking about this, then the realization hit me: I have the power that William H. Macy's "Berny Lootz" had in the The Cooler. If I were to join Facebook, the whole thing would come crashing down. They'd better consider paying me to stay away! (I hope they don't send Alec Baldwin after me with a baseball bat...)

Wednesday, December 1, 2010

DIY: Slackware on USB Flash

This post supplements my earlier post on this topic. That tested fairly recent desktop class hardware when using a CF memory module on a SATA bridge adapter as the primary storage/boot media. In this test, I perform a very similar test, but using a common laptop (Dell D610) to boot Slackware on flash memory on a USB 2.0 interface (aka, "jump drive," "thumb drive," etc.) 
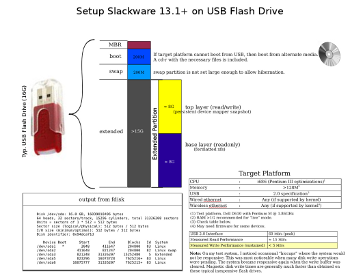
This test confirmed the concept of having a "system in your pocket" is now a reality. Note: This is a full install; the current generation of flash storage gives more than enough space to comfortably hold the full set of standard software, with no cutdowns or compromises required. R/W cycle lifetime of the hardware has also improved, but YMMV. I started this test with a 16G capacity flash drive, but more testing showed that an 8G capacity drive could be substituted in a pinch.

Update: 2010-12-28
I added this post to document a few of the tricks that make this possible using the smaller flash drive.

More later. For now, here are a couple of screenshots.

1.

This mode of operation places the "top" layer of the persistent snapshot on its own partition on the flash drive. An alternate mode uses RAM as the top layer. When the "top" layer is allocated from RAM, the snapshot is not really persistent, but it has the advantage of not incurring R/W delays associated with flash media, and it will not use finite R/W cycles associated with the media itself. Because the snapshot is generalized, there are other modes of operation which can be setup with minimal extra effort. Here are some options off the top of my head:

  • top layer encrypted

  • top layer stored on other device on other filesystem (for example, NTFS)

  • top layer on RAID 1

  • etc.


  • Of course, using a device mapper snapshot is completely optional. The current size of flash memory devices allows a "normal" install without too many tricks required. In that mode, an 8G flash device would work fine, allocating about 4G for system software and 4G as free user space. The only tricks are building the initrd with the required modules to get USB functional and setting up the bootloader. I am using my own "startup environment" which is a bit different than the standard Slackware initrd.

    2.

    Installed software includes:

  • Slackware-current (2010-11-29) -- post v13.1

  • Linux kernel 2.6.35.9

  • XFCE window manager

  • Firefox

  • Open Office 3.2.1

  • Skype

  • Gimp

  • grub bootloader

  • and, of course, it is possible to install more software, per standard tools


  • The latest X window system should also "just work" and not require tweaking /etc/X11/xorg.conf to enable startup. YMMV.

    Update: 2010-12-04
    Here is a package of files with some misc. information including statistics when running in live mode on a Dell D620 laptop. There is also a list of installed packages.

    Update: 2010-12-14
    Some more testing showed that both of the possible startup modes (live or persistent) will work on a single flash drive as small as 8G. One trick is to use a "sparse" file to hold the base install image. Specifically, an 8G XFS filesystem image can be stored on a 4G partition. This works because the 8G image is only about half full. This frees up the other half of the device for changes. This may not be quite as flexible as the 16G device because the amount of changes that can be made to the base device does not perfectly match the underlying base filesystem. However, 8G may provide enough space to make it a viable option; that is, at least until 16G devices are commonplace. Be aware that when using this mode, the user should keep an eye on the remaining space available in the snapshot because it could be exhausted first, i.e. the snapshot is exhausted even though there is extra space on the filesystem. This problem is avoided when using the 16G size.

    Update: 2010-12-15
    You should keep an eye on the space used in the snapshot image, especially when the snapshot is smaller than the target device. Here is a nice little hack:

    #!/bin/bash
    [ ! -e /dev/mapper/top ] && exit 1
    v=$(echo "scale=4;$(dmsetup status top| cut -f4 -d\ )*100"| bc -l)
    printf "Snapshot Used: %04.2f%%\n" $v


    Update: 2010-12-16 Startup Notes
    Goal: Boot to runlevel 3 in "live" mode
    Steps:
      (1) Select appropriate choice from boot menu

    This will load the kernel and initrd. I have noticed this takes a variable amount of time depending on the hardware, and possibly the mode that the BIOS uses to interface with USB. I have seen this step take between 5 and 20 seconds.

      (2) When the above step completes the kernel takes over and the login prompt should appear in less than a minute.

    Start time is somewhat dependent on specific hardware. On my hardware I observed a time of 48 seconds. The specific boot details are as follows. First, there will be a slight pause while the kernel unpacks the initrd. There is a prompt asking the user to select which display mode to use. Second, the familiar "penguin" logo will be displayed as other startup facts scroll by as the kernel performs basic initializations. Third, control will transfer to my startup environment. It probably won't be obvious when the switch takes place, but it will include a step to load the kernel USB modules and include a 7 second delay while the USB bus stabilizes. Next, a reference to the license terms is displayed and asks the user to press "enter" to indicate acceptance (or ctl-alt-del to terminate). Upon acceptance, final setup of the snapshot in the desired mode is performed. When complete, control transfers to Slackware's default init program on the target root filesystem. The initialization requires certain keys/certificates to be generated and a "graphic" fingerprint is displayed for each. Finally, the login prompt will appear.

      (3) In live mode, login as root and perform final initializations.

    The user should set the root password and run "pkgtool" and choose, "Setup: Choose the Slackware installation scripts to run again."

    When complete, add your non-root user. There are a few steps to perform here to make the user a "power" user. Add your name(s) to the appropriate groups, and possibly sudoers.

    You can install other packages. Skype is included as a Slackware package in the root directory. Install it with the command:

    $ installpkg skype-2.1.0.81-i486-1_SBo.tgz

    The above steps can be a bit tedious, and can be avoided by using the "persistent" mode.

      (4) Login as your non-root user and start a graphic session.


    $ startx

    From here, you are running GNU/Linux. You can install more software. For example, download and install the latest Adobe flash plugin for Linux.

    Update: 2010-12-20
    I performed a test where I booted on hardware at the lowest end of the possibly usable spectrum, i.e. when using at least a computer with a P6 class CPU. I documented my test separately here because this post is getting a bit cluttered.